Gene Knockout Protocol by TMP/UV Method (Ver. 1.3)
Hitoshi Inada and Ikue Mori
Laboratory of Molecular Neurobiology, Division of Biological Science, Graduate School of Science, Nagoya University
Nagoya 464-8602, Japan
0. Contents
1. IntroductionThe gene knockout is one of the useful approaches to analyze the gene function. In C. elegans, the construction of deletion mutant library using chemical reagents and the subsequent PCR screening are generally used to isolate knockout mutants because the gene knockout using homologous recombination has not yet been developed. The efficient isolation of deletion mutants requires the mutant library which shows high mutation rate and high recovery rate, and also requires sensitive PCR screening which detects the extreme low copy of deletion mutation among the large amount of wild type genomes. We describe here the routinely used protocol in our laboratory. Please contact to inada.hitoshi@cc.nagoya-u.ac.jp if you have any questions. 2. AcknowledgementThis protocol is based on the original procedures developed by Mitani Lab. at Tokyo Women's Medical University School of Medicine, Barstead Lab. at Oklahoma Medical Research Foundation, and Moerman Lab. at the University of British Columbia. We are grateful to Dr. Shohei Mitani for many invaluable advices. 3. General remarks3.1 Annotation!!!IMPORTANT!!! This shows the most important step in which you MUST NOT omit anything. For example, !!!IMPORTANT!!! If you detect a positive signal, check it twice. The signal is a true positive if it is reproducible completely. The signal could be positive if it is reproducible once. The signal must be a false positive if it is not reproducible. NOTE: This shows the important step but you can modify it. 3.2 EquipmentFluorescence microscopeZeiss Axioplan2 with the filter set for DAPI (narrow UV) and the objective lens Plan-NEOFLUAR 5 x UV radiometerUVP UVX radiometer (Digital) and Radiometer Sensor UVX-36 (360 nm)
Thermal cyclersMJ Research DNA Engine, Perkin-Elmer GeneAmp PCR system 9700, or BioRad iCycler is used. 3.3 ReagentsSDS worm lysis buffer50 mM Tris-HCl (pH 8.0), 100 mM NaCl, 10 mM EDTA (pH 8.0), 1% SDS, 200 ug/ml proteinase K. Single worm lysis buffer50 mM KCl, 10 mM Tris-HCl (pH 8.3), 2.5 mM MgCl2, 0.45% NP-40, 0.45% Tween-20, 0.01% gelatin, 200 ug/ml Proteinase K. NOTE: proteinase K is added just before use. 4. OverviewThis procedure consists of three steps: Library construction, screening, and sib-screening. The library construction is the most time consuming step in which it takes 1 ~ 2 months. You can usually isolate deletion mutants in two weeks, once the good library was constructed as we generally do. The flow diagram and the schedule are shown below.
5. Procedure5.1 Library Construction5.1.1 Brief synchronizationPut 3 or 4 young adult animals (P0) on a seeded 6 cm NGM plate. Place the NGM plates at 20 °C for 3 ~ 4 days and obtain many F1 adult animals and many eggs (F2). NOTE: Food would be consumed at this stage. Wash F1 adult animals off plates with M9 buffer, leaving many eggs on plates. Incubate at 20 °C for 1 day. The eggs will hatch, and the L1 larvae arrest development until put onto plate with food. Transfer L1 larvae into a 15 ml centrifuge tube with 5 ml of M9 buffer. Centrifuge at 1,200 rpm for 5 min at room temperature. Remove supernatant. Transfer with a sterile Pasteur pipette to 10 seeded 6 cm NGM plates. Place at 20 °C for 2 days and allow animals to grow to L4 larvae or young adult stage. 5.1.2 TMP treatmentNOTE: Set up the irradiation apparatus during the TMP treatment of the worms. Transfer worms into a 15 ml tube with M9 buffer. Place for 15 min at room temperature. Remove M9 buffer by aspiration. Wash with fresh M9 buffer several times to remove most bacteria and larvae. Suspend worms in 5 ml of M9 buffer. Vortex TMP stock solution. !!!IMPORTANT!!! TMP should be dissolved in acetone for the stock solution. !!!IMPORTANT!!! Warm with heat block to dissolve TMP completely if TMP is precipitated. Add 10 ul TMP stock solution (0.5 mg TMP/ml in acetone) to 5 ml of worm suspension (final concentration 1 ug/ml). Cover the 15 ml tube with aluminum foil. Incubate the worms in the dark for 1 hr at room temperature, with occasional gentle shaking. Set up for UV irradiation !!!IMPORTANT!!! We use a fluorescence microscope as a UV source to irradiate animals. DO NOT use the hand UV illuminator or the UV cross linker because they cannot cut off the UV of short wavelength (~260 nm) which could cause the decrease of mutation efficiency. NOTE: We use the filter set for DAPI. Turn the UV lamp on and leave at least 15 min to warm up. Put the probe of the UV radiometer on the stage.
Adjust the height, zoom, and focus on the window of the probe. Measure the UV intensity. NOTE: Check the UV intensity just before the irradiation because the lamp intensity tends to drift over time. 5.1.3 UV irradiation<< After the worms have been incubated in TMP solution for 1 hr >> Remove supernatant with a sterile Pasteur pipette. Place 20 ul of worm/TMP mixture on a parafilm sheet with a sterile Pasteur pipette.
NOTE: You can place several drops on one sheet. Carefully place the sheet with worms on the stage.
!!!IMPORTANT!!! Adjust the position and focus. NOTE: The field of illumination is slightly larger than the drop of the worms. Irradiate at 2,000 uJ (standard dose) or 5,000 uJ (strong dose). Example 1: 340 uW/cm3 for 6 sec = 2,040 uJ Example 2: 80 uW/cm3 for 25 sec = 2,000 uJ !!!IMPORTANT!!! You should try at least TWO irradiation intensities (standard and 2~5 times strong dose). Use the lamp blocking slide to control irradiation. NOTE: You can leave the room light on. << After irradiation >> Transfer each 20 ul of worm/TMP mixture to a seeded 60 mm NGM plate with a sterile Pasteur pipette. Put the plates in the dark at 20°C for 24 hr to obtain mutagenized eggs. 5.1.4 Set up a libraryWash P0 adult animals and hatched L1 larvae off the plates with M9 buffer. NOTE: The eggs laid 24 hr after TMP/UV treatment wouldn't be mutagenized. NOTE: The hatched L1 larvae wouldn't be mutagenized. Obtain many eggs on the plates. Incubate at 20 °C for 1 day. The eggs will hatch, and the L1 larvae arrest development until put onto plate with food. Determine roughly the fraction of dead egg. !!!IMPORTANT!!! Standard fraction of dead eggs will be 10~50%. If the fraction of dead eggs is lower than 10%, throw the library away and start from the beginning. Transfer L1 larvae with M9 buffer into a 15 ml centrifuge tube. Centrifuge at 1,200 rpm for 5 min at room temperature. Remove supernatant. Determine density of L1 larvae in the worm/M9 mixture. Adjust worm density ~ 25 worms/ul. Transfer 20 ul of worm solution with Pipetteman P-20 to 600 seeded 6 cm NGM plates. NOTE: Do not use repeat pipetters. NOTE: Mix worm/M9 mixture often. NOTE: ~500 worms per plate => ~1,000 genomes per plate Seal the plates with parafilm. Grow at 20 °C for 4 days (or at 15 °C for 8 days) and obtain many adult animals and L1 larvae. NOTE: You can control the growth of worms by changing growth temperature. 5.1.5 Screen for mutations in dpy genes (Optional)We score dpy mutants to determine mutation frequency. Roughly, 10 ~ 20 dpy mutants will be obtained from 96 plates. You can use unc-22 to determine mutation frequency. 5.1.6 Harvest library!!!IMPORTANT!!! Harvest worms when they have just starved. NOTE: The time required for harvesting library depends on the number of the plates. One person can handle ~ 200 plates in a day. Place some population of plates in 15 °C to delay worm growth. << For one sample set >> Prepare 96 1.5 ml tubes labeled 1 through 96. Prepare 96 200 ul tubes containing 100 ul of 2 x freezing solution labeled 1 ~ 96. Add 1 ml of M9 buffer into a starved worm plate. Transfer worms to 1.5 ml tube. Leave for ~1 hr to precipitate worm. Remove supernatant by aspiration and leave 150 ul worm/M9 mixture. Transfer 100 ul of worm solution to a tube containing 2 x freezing solution. Mix well by pipetting. Once you have harvested worms to have a tube rack full, put in a styrofoam box which is just fit with a tube rack as shown in the photograph below. !!!IMPORTANT!!! The styrofoam box should be 1.5 cm thick or more.
Place at -70 °C for overnight. << the remained 50 ul worm solution >> Add the 200 ul of SDS worm lysis buffer. Incubate at 60°C for overnight. Vortex the tubes sometimes. Store digested tubes at -20 °C until all samples are harvested. 5.1.7 Pool DNA preparation for 1st screeningThaw all digestion tubes. Pool 10 ul of lysate from each row tubes (1~12, 13~24, and so on) into a 1.5 ml tube.
Original tubes are stored at -20°C until 2nd screening. >> DNA purification (see DNA preparation procedure below) 400 ul of DNA solution in TE Transfer 200 ul of DNA solution into a 200 ul PCR tube or a well of 96-well plate Transfer 200 ul of DNA solution into a 200 ul PCR tube (for an additional stock) Store at -20°C. DNA preparationWorm lysisHarvest worms with M9 buffer. Leave for 15 min or centrifuge to precipitate worms. Remove supernatant and remain 50 ul worm/M9 mixture. Add the 200 ul of worm lysis buffer. Incubate at 60 °C for overnight (or > 8 hr). DNA purification<< ~250 ul of worm lysate >> Add 60 ul of sterilized water saturated with NaCl. Add 200 ul of chloroform. Vortex. Centrifuge at 15,000 rpm, 10 min, 4 °C Transfer 200 ul of supernatant into new 1.5 ml tube. Add 400 ul of 100 % ethanol. Mix well. Centrifuge at 15,000 rpm, 10 min, 4°C. Decant supernatant. Add 1 ml of 70 % ethanol. Decant supernatant. Air dry pellet over 15 min. Dissolve pellet in 400 ul of TE . Store at -20 °C. 5.2 Primer design and optimization of PCR condition5.2.1 Primer designDesign primers using AcePrimer v1.1 (http://elegans.bcgsc.bc.ca/gko/aceprimer.shtml). PCR product size is 1200 +/- 200 bp and nested primer interval is 200 bp. The other parameters are default values. The primer sets with lower Q-value should be selected. Change parameters (PCR product or Nested primer interval) if appropriate primer sets are not found.
We select two primer sets for a region which contains exon for N-terminus or catalytic domain of protein. The optimum PCR product size is about 1kb. 2kb of PCR product size is optional. Over 2 kb of PCR product size could not detect deletion efficiently.
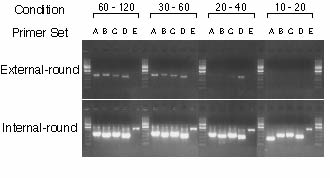
5.2.2 Optimization of PCR conditionExternal primer pre-mixture1 x PCR buffer, 1.5 mM MgCl2, 10 uM dNTPs, 0.2 uM external left primer, 0.2 uM external right primer, 0.025U/ul Taq DNA polymerase. Internal primer pre-mixture1 x PCR buffer, 1.5 mM MgCl2, 200 uM dNTPs, 0.2 uM internal left primer, 0.2 uM internal right primer, 0.025U/ul Taq DNA polymerase. Cycle condition1. Denature 94 °C, 1 min 2. Cycle (x 35) 94 °C, 10 sec -> 60 °C, 10 sec -> 72 °C, X sec 3. Extension 72 °C, 2 min 4. Hold 10 °C X depends on the PCR product size. See the table below. !!!IMPORTANT!!! You SHOULD optimize X for every primer set.
!!!IMPORTANT!!! We use Invitrogen rTaq DNA polymerase. DO NOT use the Taq DNA polymerase for LA-PCR such as TaKaRa Ex Taq or LA Taq. !!!IMPORTANT!!! DNA fragment SHOULD NOT be visualized in the external-round PCR !!!IMPORTANT!!! DNA fragment should be visualized in the internal-round PCR Example:
Optimum condition
5.3 Screening5.3.1 1st screeningPrepare external primer pre-mixture for 100 samples. Keep the pre-mixture on ice. Prepare a 96-well plate with external primer pre-mixture. Add 1 ul of the pooled DNA into each well. Mix well. >> external-round cycling Prepare internal primer pre-mixture for 100 samples on ice. Prepare a second 96-well plate with internal primer pre-mixture. Add 1 ul the external round reaction mixture into each well. NOTE: Use a 8- or 12-channel pipette. Mix well. >> internal-round cycling Add 4 ul of 6 x loading buffer. Mix well. Electrophorese 10 ul of PCR products on 1% agarose gels with EtBr in 1 x TAE Example:
If you detect positive signals, check the pooled DNA tubes again. !!!IMPORTANT!!! If you detect a positive signal, check it twice. The signal is a true positive if it is reproducible completely. The signal could be positive if it is reproducible once. The signal must be a false positive if it is not reproducible. NOTE: Several PCR fragments derived from deletion mutants would be detected in the 1st screening, but a half of them would be reproducible. NOTE: For example, if the tube 6C is a positive, check 6C to confirm as a positive signal and the other tubes (6A, 6B, and 6D~6H) as negative controls.
5.3.2 2nd screeningThaw a set of original tubes (12 tubes). >> DNA purification (see DNA preparation procedure) 400 ul of DNA solution in TE. Transfer 200 ul of DNA solution into a 200 ul PCR tube or a well of 96-well plate Transfer 200 ul of DNA solution into a 200 ul PCR tube (for an additional stock) Use 1 ul as PCR template (Store the purified DNA tubes at -20 °C). >> Nested-PCR If you detect positive signals, check the pooled DNA tubes again. NOTE: For example, if the tube 27 is a positive, check 27 to confirm as a positive signal and the other tubes (25, 26, and 28~36) as negative controls. !!!IMPORTANT!!! The true positive should be reproducible in the 2nd screening. !!!IMPORTANT!!! If you detect a positive signal, check it twice. The signal is a true positive if it is reproducible completely. The signal could be positive if it is reproducible once. The signal must be a false positive if it is not reproducible. 5.4 Sib-screening5.4.1 1st sib-screeningThaw the positive frozen stock by warming with hand. Transfer worm solution into 2 ml tube with a Pasteur pipette. Add 2 ml of E.coli solution. (final ~2.2 ml) Transfer 20 ul of worm/E.coli mixture with Pipetteman to 96 seeded 60 mm NGM plates. NOTE: Do not use repeat pipetters. NOTE: Mix worm/E.coli mixture often. Grow at 20 °C for ~ 5 days and obtain many adult animals and L1 larvae. NOTE: Food would be consumed at this stage. Add 1 ml of M9 buffer into a starved worm plate. Transfer worms to 1.5 ml tube. >> DNA preparation Store the plates at 15 °C. >> Nested-PCR screening Use 1 ul of lysate for PCR template. If you detect a positive signal, check again. 5.4.2 2nd sib-screeningPlace starved animals onto a new seeded 6 cm NGM plate. Incubate at 20 °C for 2 days to recover worms. Transfer a single animal to a seeded 3.5 cm NGM plate. Prepare 96 single worm plates. Incubate at 20 °C for 2 days to obtain many eggs. Transfer the worm into a 200 ul PCR tube containing 5 ul of single worm lysis buffer. Incubate at 60 °C for 1 hr. Heat at 95 °C for 15 min to inactivate Protainase K. !!!IMPORTANT!!! Heat inactivation is required for at least 15 min. !!!IMPORTANT!!! DO NOT use the SDS worm lysis buffer for this step because SDS inhibits the following PCR step. >> Nested-PCR (or internal-round cycling) Use 1 ul of lysate for PCR template. If you detect positive signals, check them again. 6. References
1. Gengyo-Ando, K and Mitani, S (2000) Characterization of mutations induced by ethyl methanesulfonate, UV, and trimethylpsoralen in the nematode Caenorhabditis elegans. Biochem Biopys Res Commun. 269: 64-69.
2. Barstead, R.J. (1999) Reverse genetics in C. elegans, a practical approach ed. Hope, I. A., 97-118. Oxford University Press, New York.
3. http://ko.cigenomics.bc.ca/ |